This detailed advanced illustrator tutorials how to create a diamond sparkling necklace metal tutorial will show you how i created the Diamond necklace available to download freely from Aivault through this post. The steps described here will take you through the process of drawing then coloring using very simple steps.
It is not a basic learning tutorial , i expect you to already know drawing tools , basics of drawing , pathfinder tool , live paint and using guides.
OR if you are starting out Read more tutorials on this site
Step 1
CREATING THE DIAMOND SHAPE
Star-off by creating a circle and we all know how to it by now 🙂

Next we will make use of the guides and star dividing the shape with equally sized straight lines and guide as a reference.


Step 2
USING GUIDES FOR DIVIDING THE SHAPE
Create a copy of one horizontal and one vertical line , select the rotate tool , while pressing alt create and rotate a copy of both lines as well as the guide lines.

Keeping the intersecting point of the guides and the lines as a reference align a square inside it , similar to the one seen below.

As shown below create a copy like we did with the lines and rotate it .

Now we need more guides placed , now i dont know any other way of creating the angled guides , i never really explored how to do it 🙂 , my process is to first unlock your diagonal and vertical guide select both using select tool , click on the intersecting point hold shift+alt and rotate the copy . Holding Shift will give you a snap to the middle point. hope it is clear below you can see the screen shot while i rotated the guides.

And here i have a copy done again you can do this by hitting CTRL+D which will repeat your last action.

With guides being our reference start drawing lines as shown below these are in pink color so you can see the progress
Step 3
ADDING DETAILS


Step 4
COLORING
Now turn off the guides once you are done. select the full divided / drawn circle with lines and square and using the Paint Bucket Tool fill it up with one color.
Ok you might say why not just fill the circle with foreground color change , the technique i used here is to break the full drawing up in sections and i prefer using live color option HOW? see below.
Here the full drawing is selected and then filled up with one single color . the bounding box you see below show that this is a live color object now .

Click on Expand which you will see on the top bar. This will break the full drawing into devided section making it easy for us to color each. Before doing that left click and ungroup.

Fill it up with gradience as show below

Create a star shape , i will not go into detail on how i did this one in short select the star shape tool with 6 points. create a copy place above and give a slightly tinted color.


Step 5
CREATING THE BACKGROUND
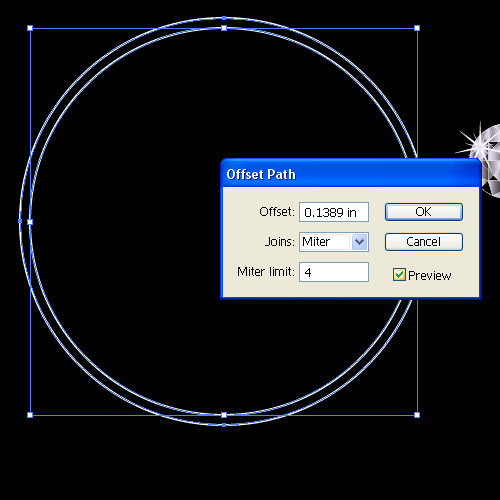
I created a black bounding box now and had sent it to back so i can better develop the final image. create a circle , and go to object>path offset path to create a bit smaller circle placed inside this one.

Using live Paint fill it up with gradient Create a copy and align in the middle

Group the diamond shape that we created above and start placing it inside the RING that we created.


Give a gradient to the rings as show below.

I created another ring silightly broader to place at the back of this whole drawing. ( create one , offset and use pathfinder to intersect You may want to learn the tools if you dont know then See the Guide here )

Again take a copy of this broader circle and place at the top , and draw an oval shape filled with same gradient.
Step 6
CREATING THE CHAIN

Start building the chain with the copy of the same thing


And Finally the whole thing is complete give a finishing touch by using copy of the SHINE we create using star shape and place it on top

FINAL PREVIEW
Create more copies and give a bit of transparencies.


 [private]I’m Done! Share what you created if you create something using same technique! OR download the Vector File to explore my work place.[/private]
DOWNLOAD THE SOURCE FILE WHEN YOU ARE A MEMBER. Login Or Sign up
You May also like Some more Vector Basic Drawing Tutorials Or Complete list of Tutorials!
[categorythumbnaillist 13]
 Printables, graphics, backgrounds, vectors, illustrations, fonts, and design elements given on this site are for personal use only. You may not alter them or redistribute them for free or monetary gain without written consent from the author, Asma Murad. If you want to share these resources with others, please share the link to the blog post. Teachers/educators: You may share these with your classes and colleagues as long as they are not edited in any way, Cliparts & Resources shared for free are not to be used as printables for sale.


