Learn how to draw a corporate background image in adobe illustrator, vector illustration using basic tools #adobeillustrator #graphicdesigner #graphicdesigntools #vectortutorial #vectortut
Creating backgrounds which are effective is an essential part of the process of creating good designs .Here we will create a background which you can use for multiple projects in the end , ie background for presentations , for websites or simply an ad. This is a simple tutorial showing step by step how to create one using tools such as Pen tool , brushes and a simple Arc Effect.
Step 1
Creating background
Start off by creating a simple gradient background Here is the Theme of colours we will follow
It is always a good idea to have it clear in your mind what theme you are going to follow . I use often use colourlovers.com to help me in this process.
Step 2
Drawing Bleded lines
Using the pen tool draw two white stroke Lines having no fill.
Go to Object> Blend> Blend options
Adjust your blending options to some specified steps , something like this.
Hit Alt+Ctrl+B ie Object>Blend>Make
Create in the same way two more lines using Pen Tool (P) and using Object> Blend > make
Since your lines are all placed up now will be a good idea to play around with the nodes ( click on the End of start of your original line) adjust handle and stroke to get a better effect and curve in the lines. Here is my final result which i am happy with
Step 3
Elements Build up
Now we need to bring some elements into it . I brought This worldmap from my library and pasted it on the workboard
Right Click > Arrange> Bring to Front
Using a colour coinciding with the theme of your work colour the map accordingly
Step 4
Using Effects
I will use some effect to modify this map a bit
Go to Effects> ARC
Apply the effects you will get something like this
Step 5
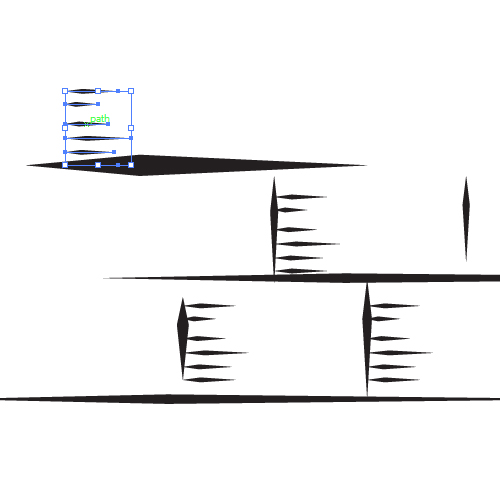
Creating Arrows using Brushes
create some more random lines using the pen tool
open up your brush pallete Window> Brush Libraries > Arrows Standard
Select all your random lines and pick out an arrow brush and apply
Select each line one by one adjust stroke and width until you are satisfied with the outcome go to object>Expand your lines and drop a gradient shade to it , here i picked up from my colour pallete white and grey.
Step 6
Refining and Balancing
I am not too happy with the background at this point so i will add up a few more shapes .
And more
fill them up with the same gradient colour lighter than your background’s adjust transparencies until you are satisfied with the final outcome!
Chevron stripes have always been in fashion , and i don’t remember seeing anything with chevron stripes that doesn’t look good ! have you? . And when it comes to creating vector chevron patterns in illustrator it cant be easier than this and below i will tell you how.
I have earlier talked about some Premade vector patterns brushes that you can easily apply to a line in illustrator . And create instant effect of various chevron lines .
OR
if you are not at all familiar with What are vector brushes you can check out these posts of mine about vector patterns illustrator.
This video cast shows how in a few steps you can create chevron patterns brushes for illustrator the vector brushes are easy to use and can be easily colored for different widths and sizes.
[products_categories_slider title=”Some of the premade brushes” per_page=”-1″ numbers=”yes” hide_empty=”yes” style=”traditional” orderby=”menu_order” order=”desc” category=”1160, ” ] OR HOW ABOUT SOME FREE RESOURCES?
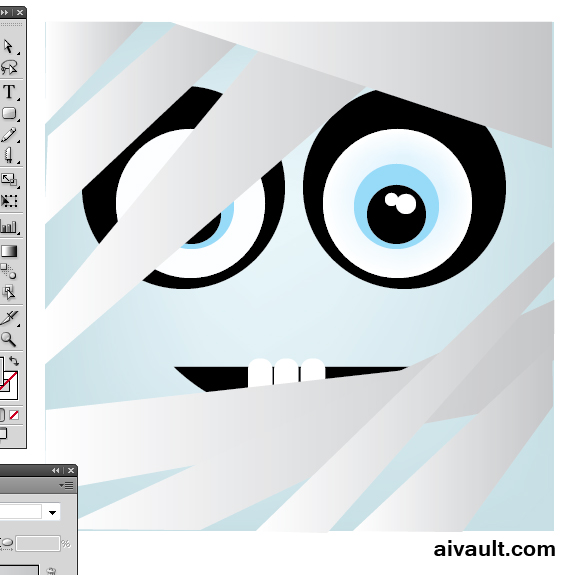
Step by Step Illustration tutorial :How to Draw Halloween Square Mummy Character
Welcome to our step-by-step Adobe Illustrator tutorial, where we’ll be delving into the world of vector art to create an adorable mummy character. Unleash your creativity and join us on this artistic journey as we learn essential Illustrator techniques to bring this cute and quirky mummy to life.
Whether you’re a seasoned illustrator or a complete beginner, this tutorial will equip you with the skills to create stunning vector artwork that can be used in various projects. So, let’s dust off our digital bandages and get ready to unravel the secrets of vector illustration as we craft our very own charming mummy character
First of all the preview of what we will be creating.
PREVIEW
STEP 1
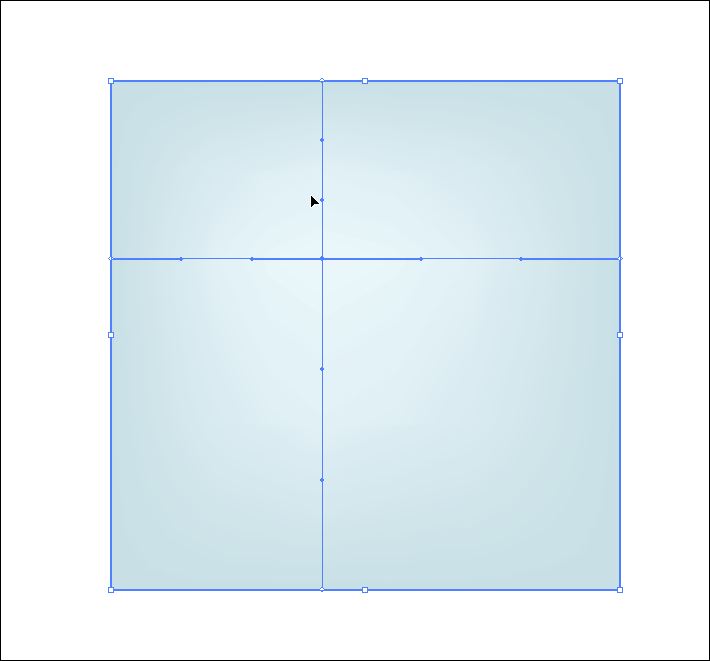
Start off by creating a simple square , using the square shape tool while pressing shift create a perfect square and color it a light blue color.
STEP 2
Next use the mesh tool (U) and create a mesh node anywhere you like and , now using the direct selection tool (A) select the central node and color it a lighter shade.
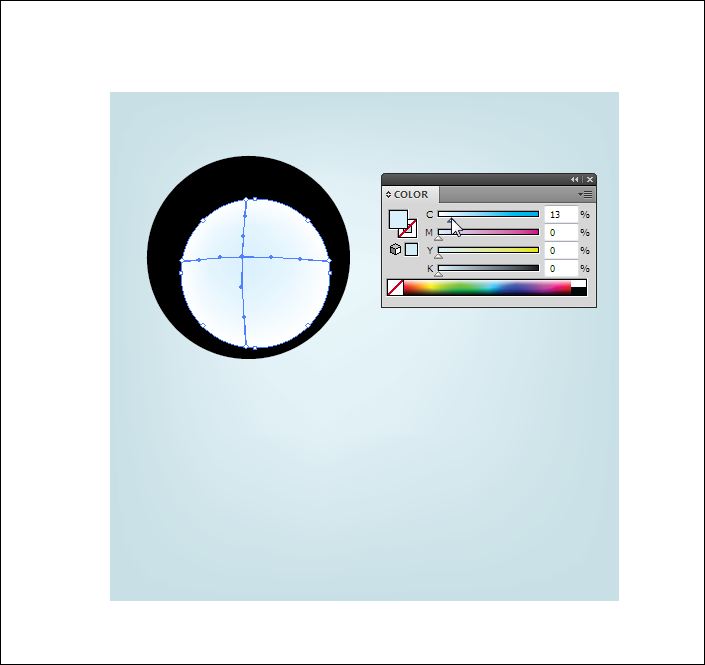
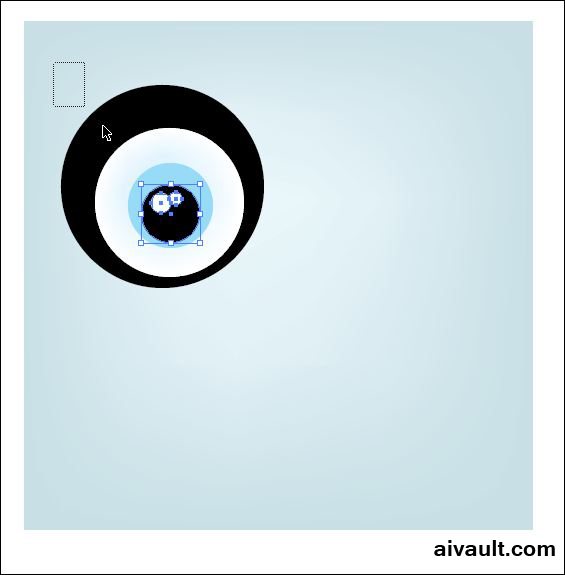
Creating eyes! , draw a black circle and on top of it draw another circle that is white , now using mesh tool create another color point on the white circle , give it a slight blue colour.
Pretty obvious what i did here , one more black and two more white circles.
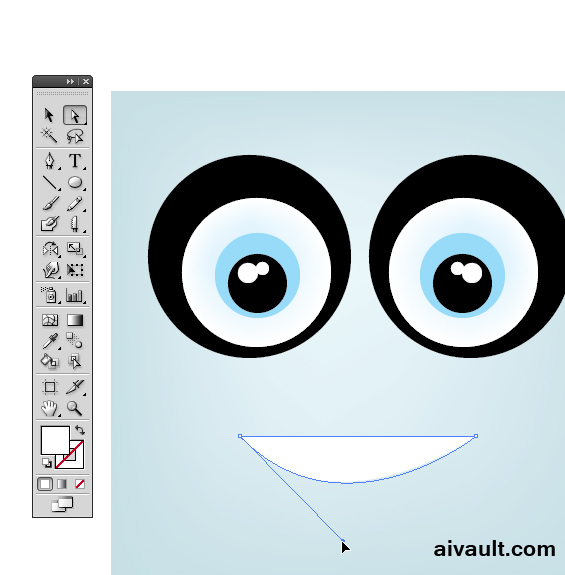
STEP 5
Using Pen tool create a smily little mouth
TIP : to join end points select both point and hit CTRL+J
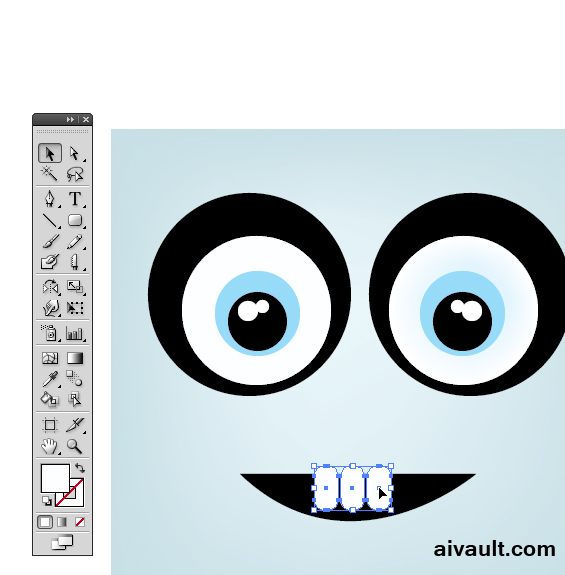
STEP6
Use rounded rectangle tool and create three teeth side by side.
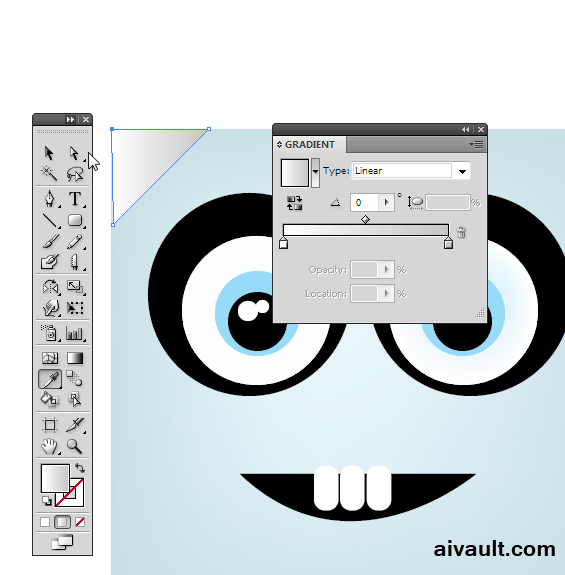
STEP 7
Using Pen tool(P) draw a gradient filled shape , i start randomly and keeping it a bit rough kept on wrapping up my mummy boxter.
STEP 8
Free hand drawing using pen tool continues.
STEP 9
DONE!
**Boxterz is a collection of whimsical boxed characters which are my new line of illustrations registered and ready for licensing , for licensing inquiries please contact me .
The Character is registered please do not copy or distribute for commercial usage , all rights reserved.
Here I am again with another illustrator techniques that saved my life so many times. Why am i screaming to get rid of that meshy messy mesh!? well just recently one of my illustrations Happy sun and moon was requested to be transformed into a wall decal for kids room. My problem arrived when i opened up the original file in my hard drive all colored up using mesh tool with the same technique that i used in coloring . And now converting the design into a flat appearance-less file for process of cutting the decal silhouette was required. Below is the preview of the illustrated objects and decal design if you are wondering 🙂
and the decal design
The Scenario
I want to get rid of mesh color fills messing up my file , yes as much as i love coloring up with mesh in works like this , things might get messy , as mesh refuses to go away from the final file even though i have deleted all the color nodes , the appearence pallete still shows Mesh points! and it just wont show how to delete the mesh points!? Yikes! help!
The Solution
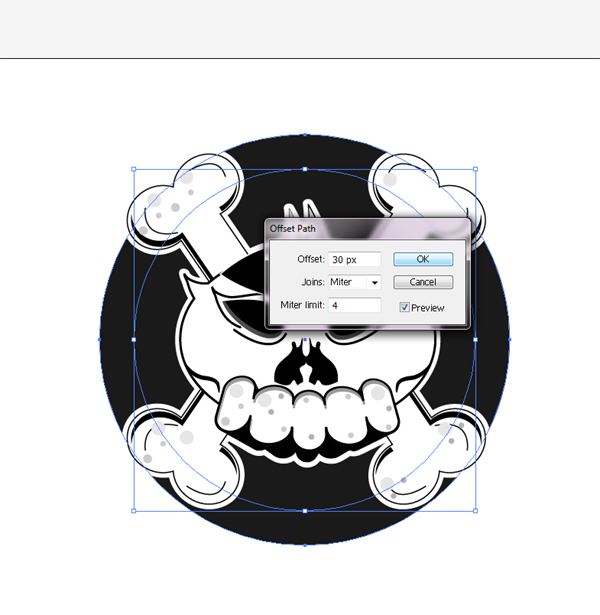
Select the shape (now just outline of no mesh fills visible but still a mesh shape) go to path > offset path and create a new path just slightly offset this will result in a slightly bigger shape but with no mesh points! Voila i’m a happy girl 🙂 . If anyone has a better way of cleaning that up i or a solution where i can just remove it let me know !
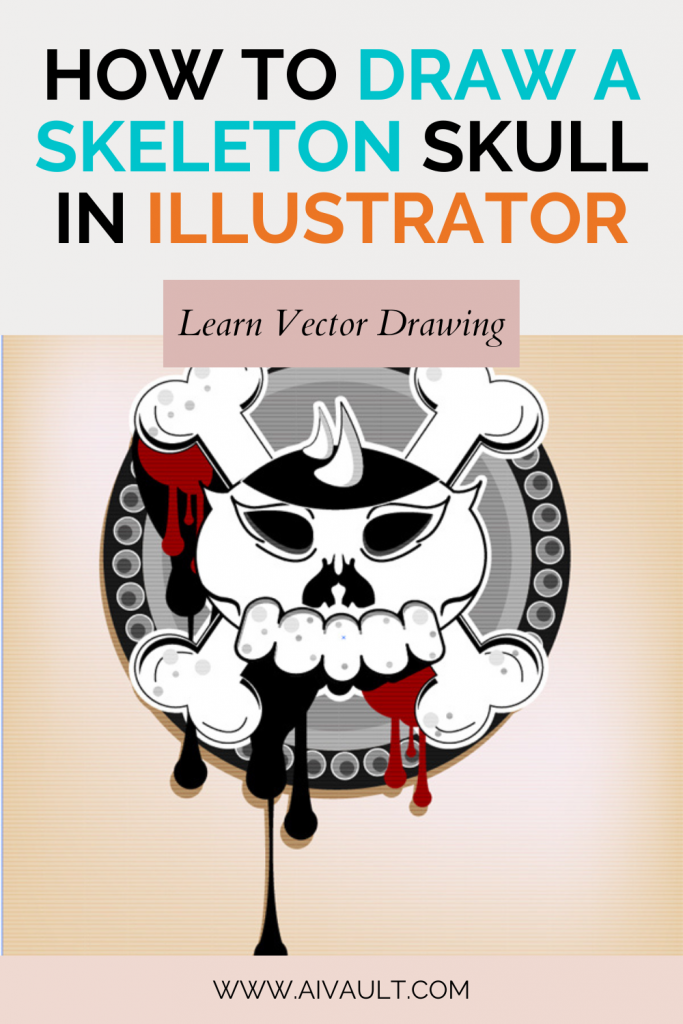
How to draw a skeleton Skull is really easy in vector. This skeleton drawing tutorial is great for beginners This vector Adobe illustrator Tutorial covers making of a sugar skull illustration using easy and basic illustrator tools .
By the end of this tutorial you will know how easy it is to draw a skull using illustrator. It is more of a visual walk through i will be glad to describe any step if you need help along the way just leave a comment and i will get back.
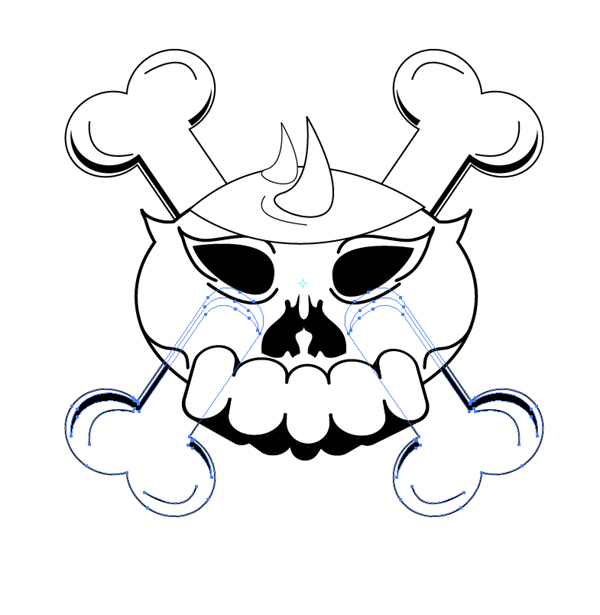
we will be working our way toward the following illustration of a skull
How to draw a skull easy for beginners
Tools used during Adobe illustrator Tutorial include
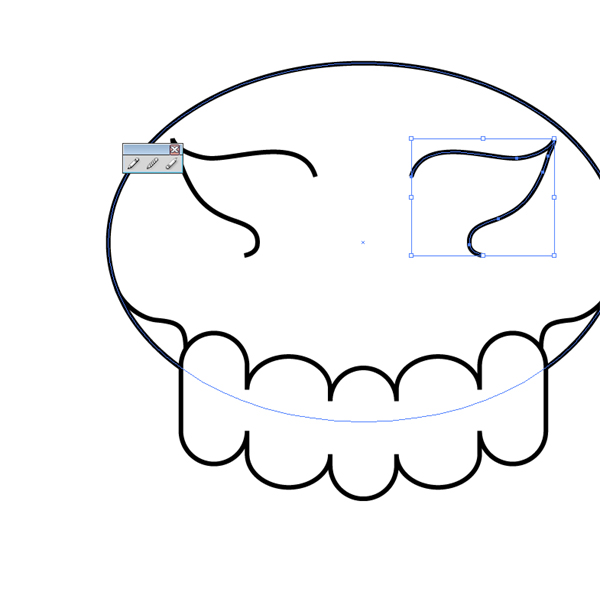
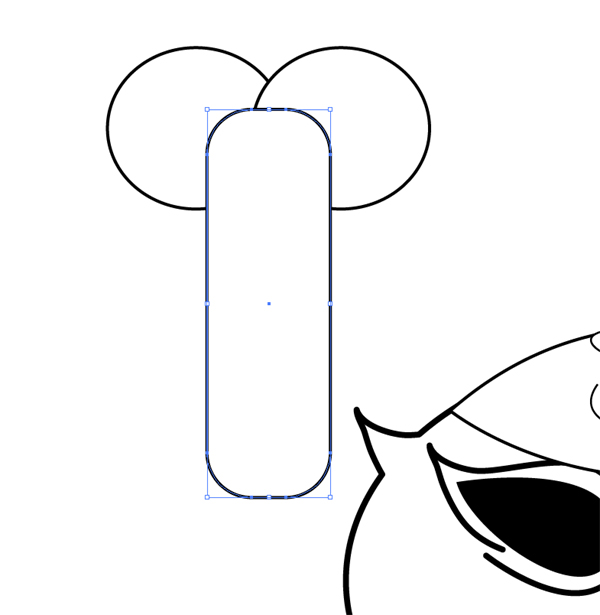
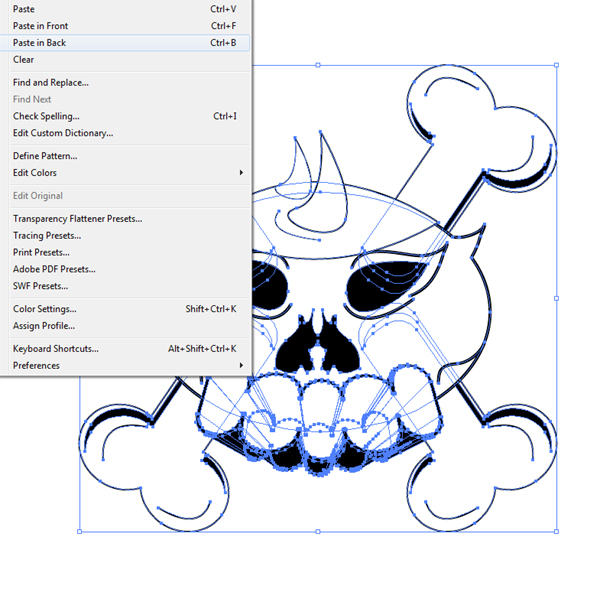
STEP 1 : USING DRAWING TOOL FOR THE OUTLINE OF THE SKULL OF A SKELETON
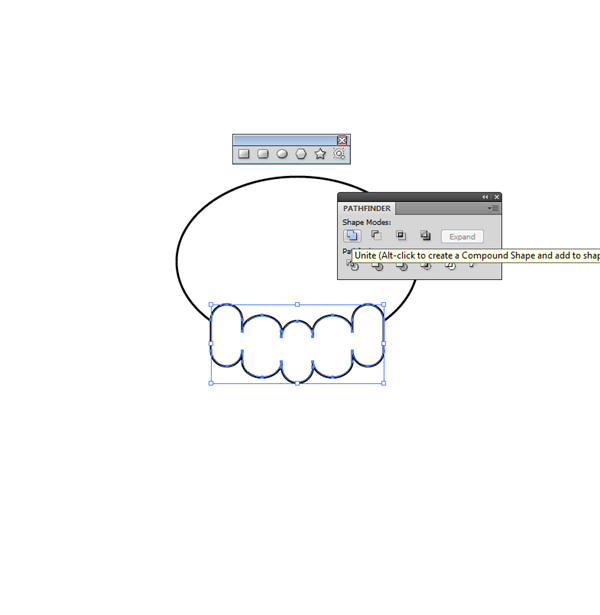
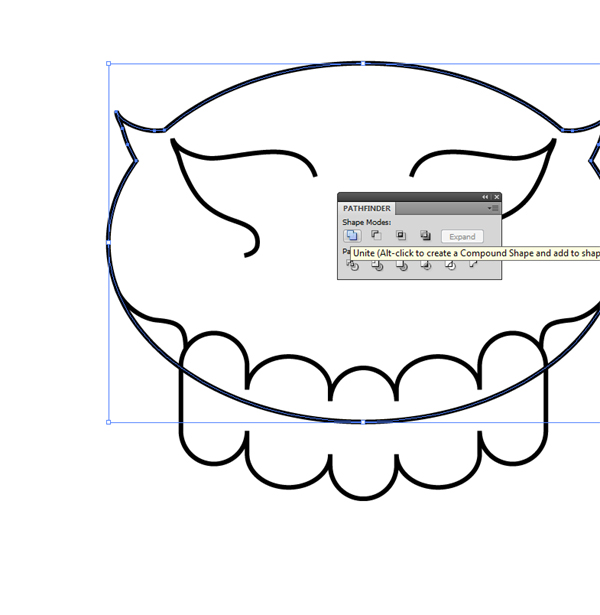
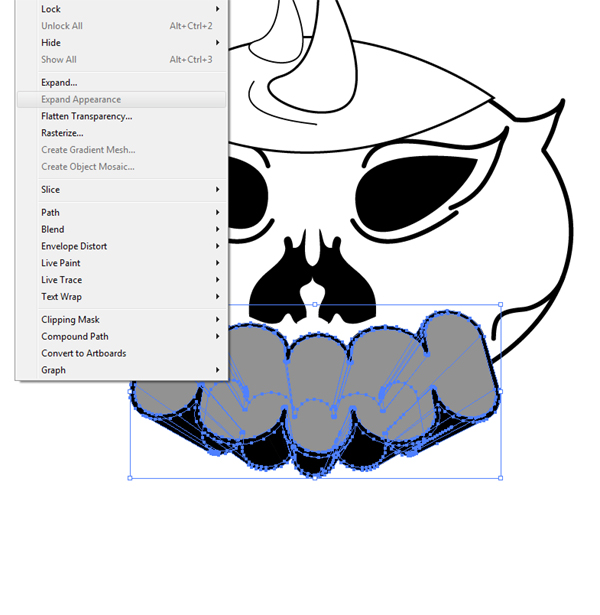
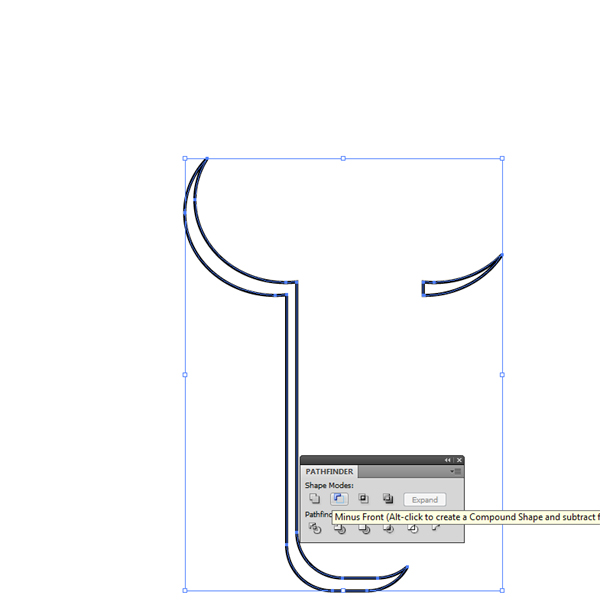
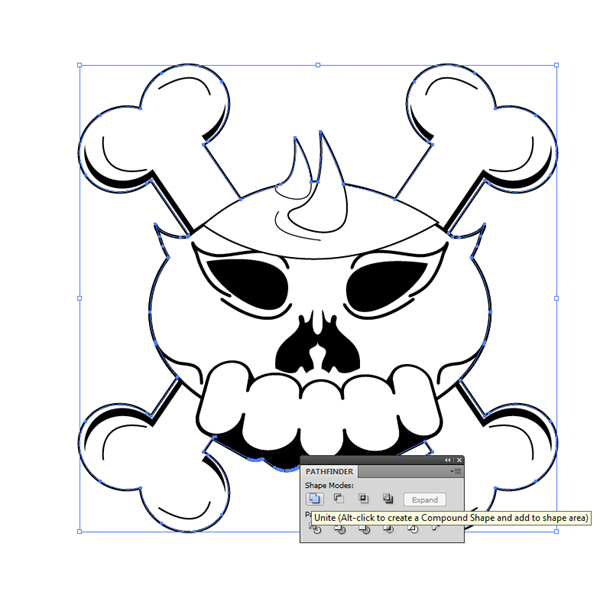
STEP 2 : CREATING TEETH SHAPES ON THE LOWER PART OF HEAD USING PATHFINDER TOOL
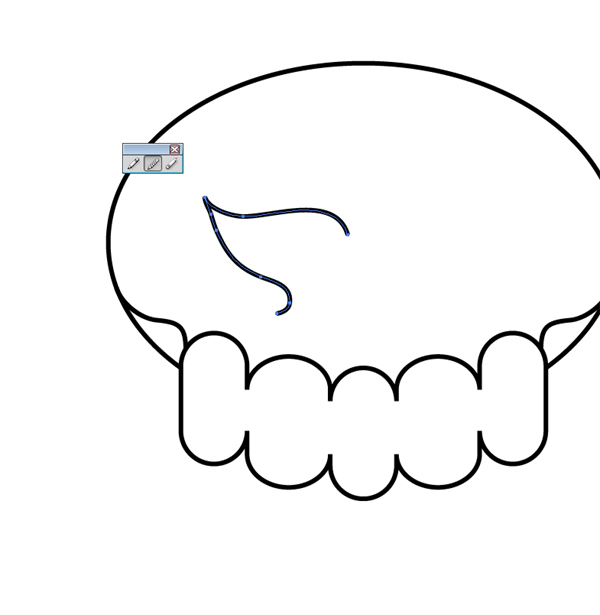
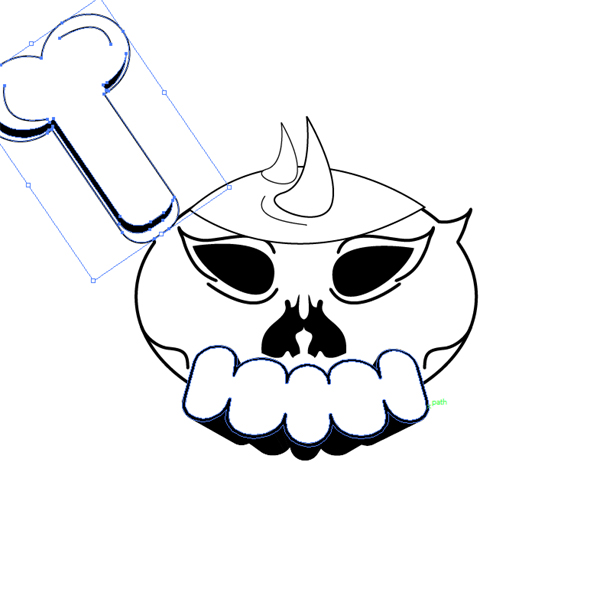
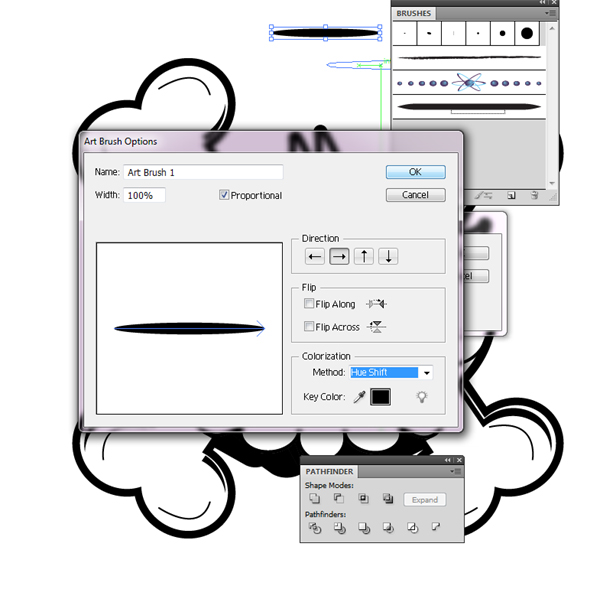
STEP 3 : FREE HAND DRAWING USING PEN TOOL FOR SHAPES
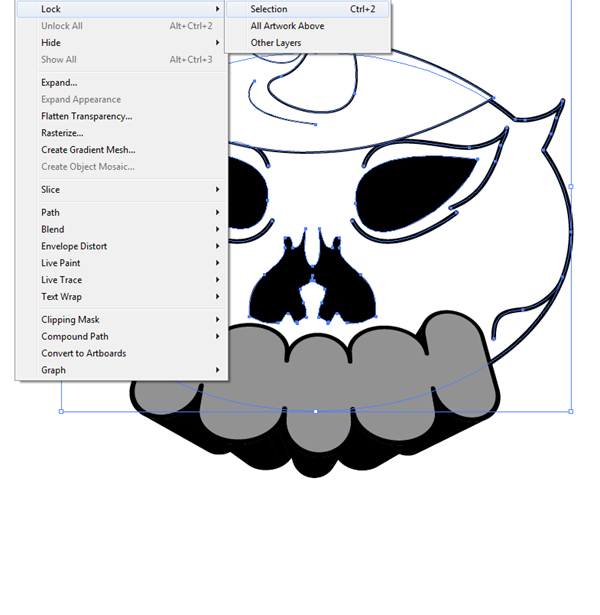
STEP 4 : PATHFINDER TO JOIN SHAPES
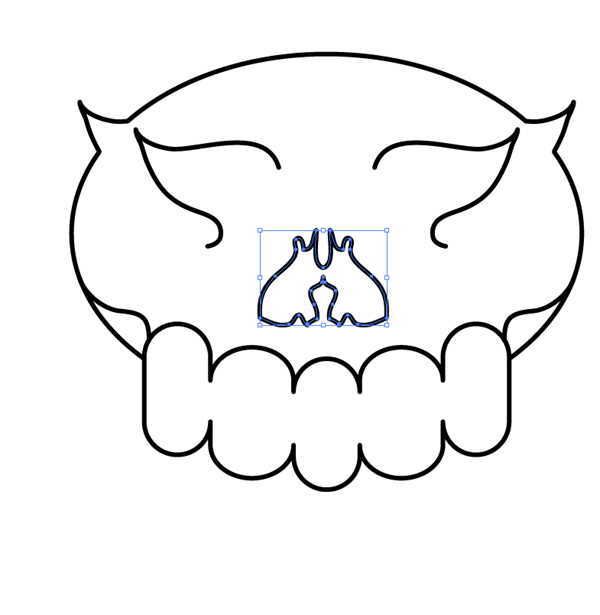
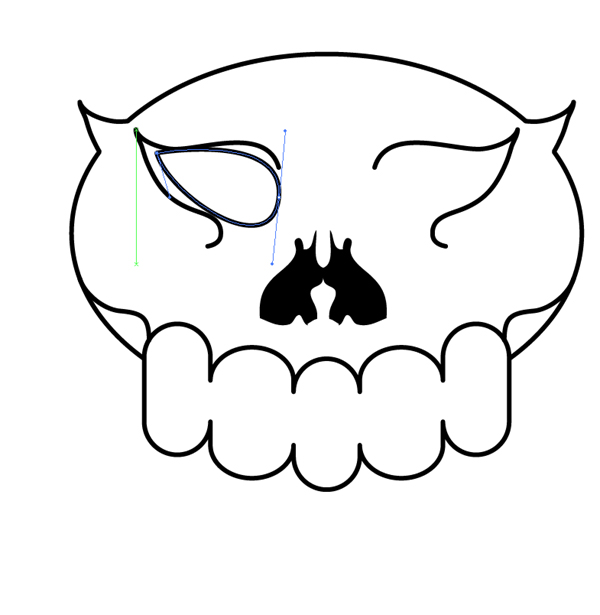
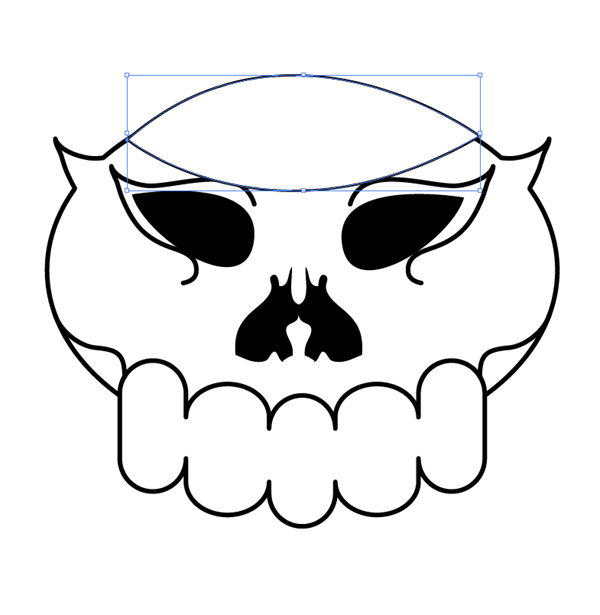
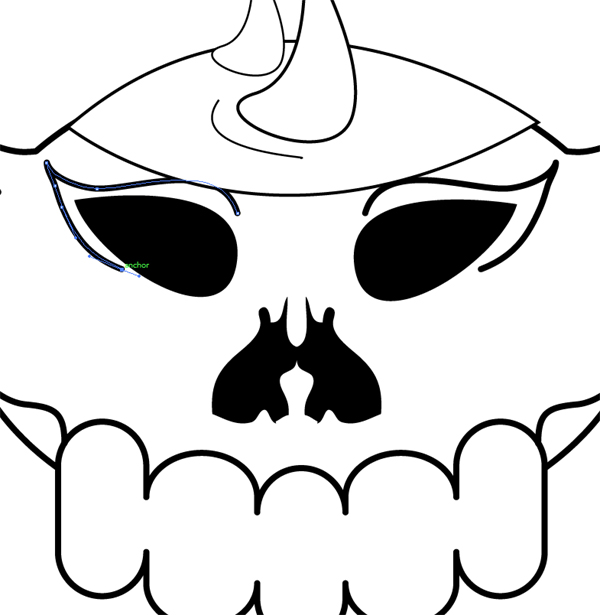
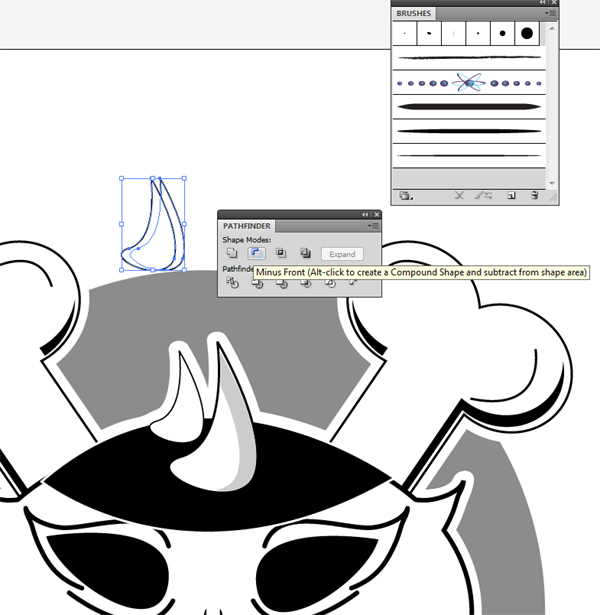
STEP 5 : ADDING DETAIL OF EYES, NOSE & OTHER SKULL ELEMENTS
How to draw a skull easy for beginners
How to draw a skull easy for beginners Adobe illustrator Tutorial covers making of a sugar skull illustration using easy and basic illustrator tools . This vector tutorial shows how easy it is to draw a skull using illustrator
[private]This tutorial was originally written for Premium members , and have stayed in the private collection for too long , it is time to get this story a little attention 🙂 so i am reposting this tutorial for regular readers. Hope you like it.
In this tutorial i will show you how to set up an illustrator document for working in illustrator to work better in flash. I will also tell you how to create an animation IN illustrator FOR flash. And export animated swf files from illustrator . Source file is available for download at the end of the tutorial. (more…)
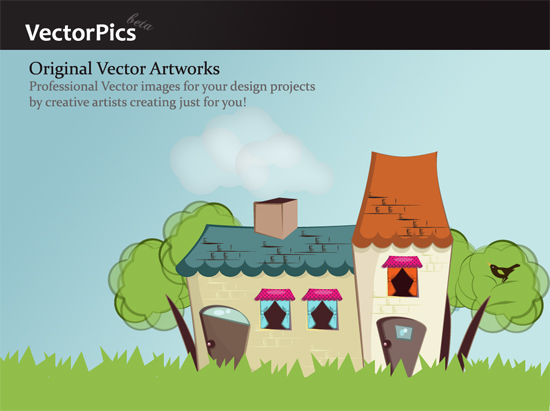
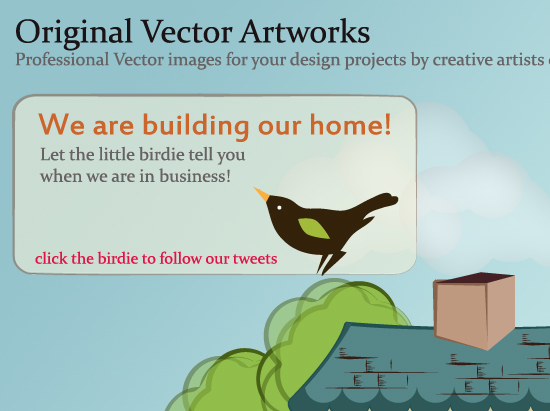
[private]Recently i worked upon creating a splash page for Vector pics website
I created this tutorial which will walk you through the making of this page , illustration was first sketched , i will admit that the final image changed considerably from the initial sketches but below you will find some step by step making of the splash page with little description and the details of the tools involved.
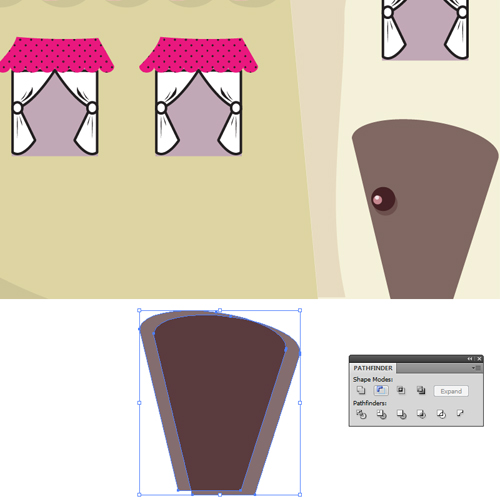
Step 1
Starting with just the basic shapes squares and rectangles i followed up my initial sketches to lay down the structure of the house nothing fancy just squares and rectangles.
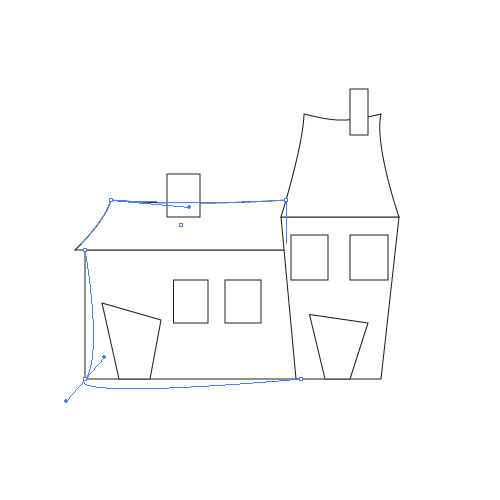
Step 2
Selecting nodes started distorting the shapes and forms.
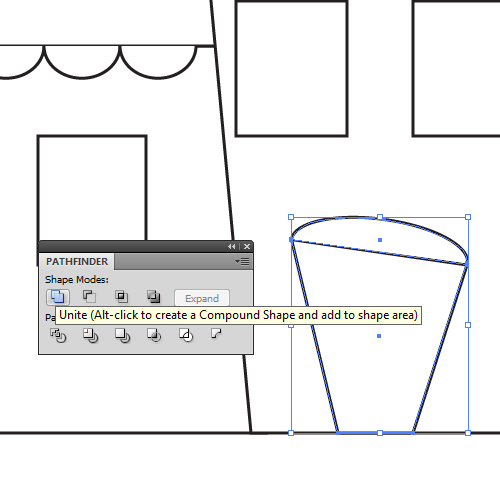
Step 3
Two shapes united to make further shapes
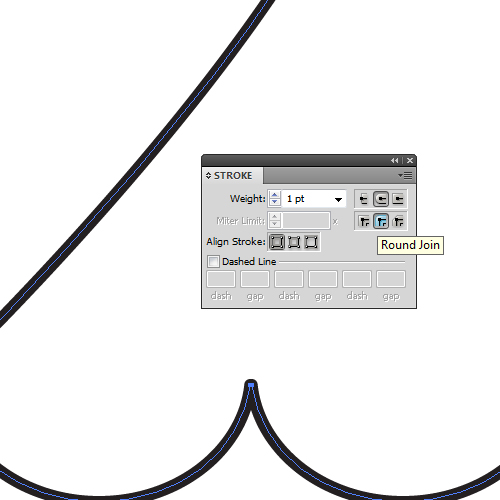
Step 4
Round up the corners of the stroke for a better formation
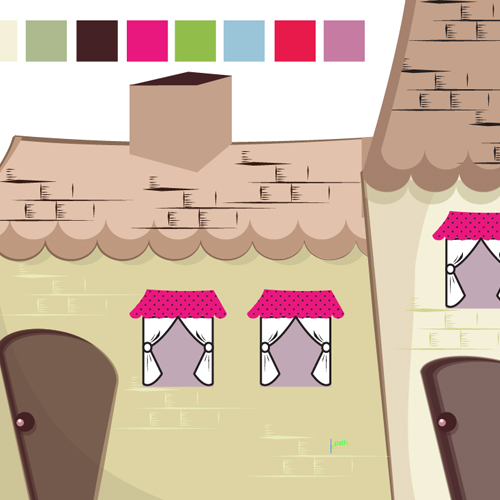
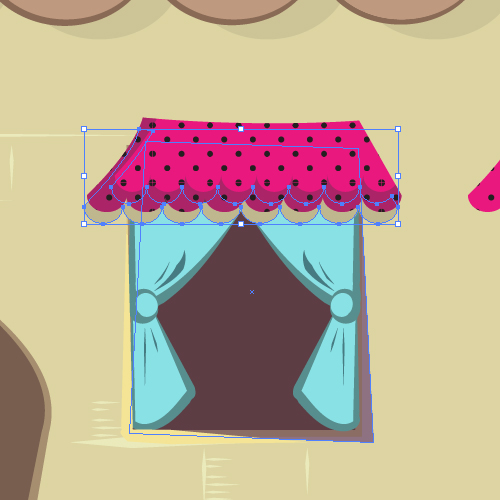
Step 5
Some details added to the windows
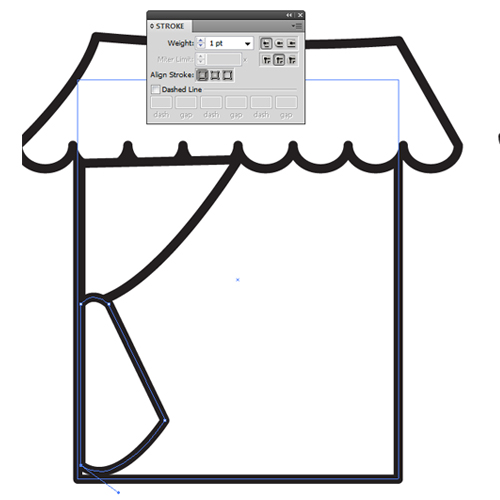
Step 6
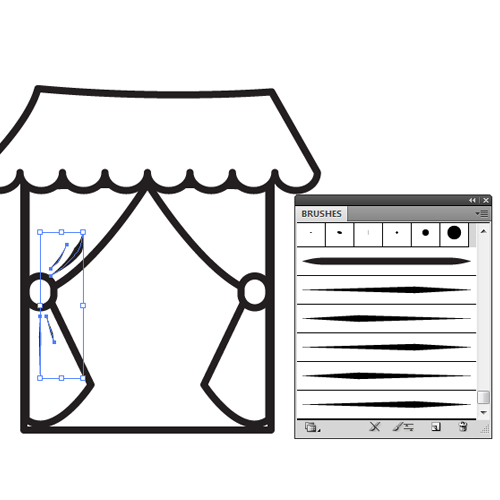
Using my most handy tools vector brushes for strokes.
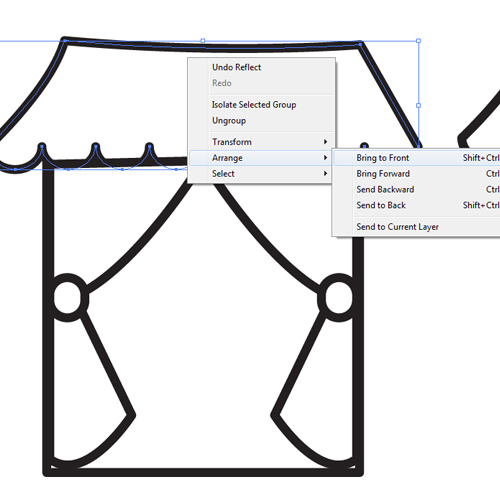
Step 7
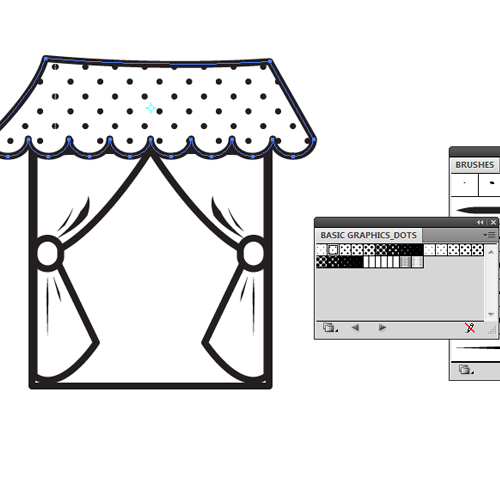
Added some basic patterns to shapes , here i created a copy of the shape broght it forward and filled it up with the basic graphics dots swatch.
Step 8
Finished creating one window and copied and placed it on other locations as well.
Step -9
The brick wall detail was creating using Drawing brush strokes of different widths.
Step 10
Randomly placed grouped copies of the bricks.
Step 11
Time to color , i planned out the colors i would like to use .
ILLUSTRATOR TIP: Keep small shapes filled with your pallet on your work area easier to pick and fill with eye dropper tool. if you are lazy like me in creating swatches everytime 😉
Step 12
Further coloring and shadows creation , i simply created duplicates of the shapes and placed them in a lower layer , with a darker color and reduced the transparency.
Step 13
Place Shadows against your imaginary source of light to give life to the object.
Step 14
Further details added a knob to the door , copies of circular shape in different shapes.
Step 15
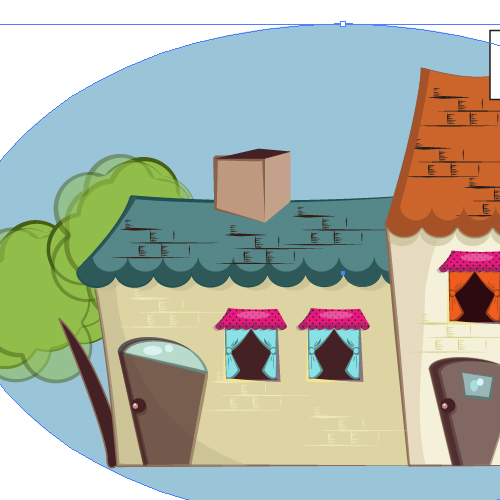
Development of shadows and light continues
Step 16
Since i plan to place this house against a light blue background i placed an oval shape behind just to get the whole feel of the direction color harmony is going to . ( Knowing background will be developed in photoshop)
Step 17
We’re in photoshop now! copied and placed a little grass layer with copies of one symbol.
Step 18
Added some cloud shapes . some text and extras like the little bird on the tree.
[private]Here is the preview of one of my flash animations which is well received through ActiveDen click the image below to see it in action
And since this was created such long ago i no longer have the source file of this in my system , the vector version 🙁 . Anyway i just wrote down this tutorial while i redrew it for another project that came across.
At the end of the tutorial you can download the source file as well .
lets move to some simple steps using pathfinder and offset path to create the weather icon of clouds pouring big drops of rain.
Step 1-
Draw a bunch of circles
Step 2-
Use pathfinder to unite all the shapes in one , and if you miss some place in the middle which didnt add up to the final shape just use direct selection tool (A) to select and delete them.
Step 3-
Give it a nice blue stroke with rounded Cap.
Step 4-
Next Expand the stroke
Object > Expand
Step 5-
Right click the shape and ungroup the whole thing
Step 6-
Now i will use offset path to create a similar smaller shape in the middle.
Object>Path>Offset Path keep the offset in negative to give you an inner shape.
Step 7-
Select the inner shape that you just created and give it a gradient fill.
Step 8-
Now we have another filled area which HAD a stroke of blue behind it (as expanded in step 4) , select that and ungroup
Step 9-
Select the white fill and using eye dropper tool give it a gradient as well.
Step 10-
Select the two gradient filled cloud shape bring them forward
Right click > arrange > bring to front
Move the two shapes towards left a bit , just to give the blue outline some character and life. you will also noticed that i i changed the blue stroke tone here a bit.
Step 11-
Just to add a little bit of interest in the cloud shape i created an eclipse shape using two circle and then again pathfinder to minus the front.
Step 12-
Arrange this shape on the cloud somewhere anywhere you like to achieve something like this…
Step 13-
Notice here i started to build up the final look , so i added a blue background to the cloud shape just to see things clearly on how they will look on my final project . Give the shape a bit of drop shadow.
Effects>stylize>Drop Shadow
Step 14-
Create a copy Scale and arrange .
Step 15-
I drew a small circle and selected the top node with direct selection tool (A) and just pulled it upward a bit and then adjusted its handles to create a drop of water . This drop has the same gradient fill and same shadow effect.
Step 16-
We are done!
Here is what i came up with
Click on the link below to download the source CS file.
Fonts and Typography : Create your Own Font illustrator
This tutorial will take you through creating a custom Font while understanding the dynamics of Blend Tool .
*By definition, a blend is the result of two or more items that are combined. In Adobe® Illustrator®, a blend is a set of at least two objects that morph into each other. In an example where you are blending two objects, Illustrator generates new shapes that appear between the two objects, making it seem like one of the objects is turning into the other. The iterations that are created between the two main objects (also referred to as key objects) are called steps
I get questions through email time after time , which i mostly answer through email . I thought it is a better idea to answer these through Aivault post! So today’s questions is How to tilt a pattern fill? Answer is very easy. …
Step 1
give your shape a fill which is as easy as clicking on the shape then choosing a swatch pattern to fill it up.
Step 2
Select the rotate tool in the toolbar and double click it a tool window will open which will give you few options.
You must deselect “Object” (if that is not what you want and only want to scale the pattern fill) enter the angle value and hit ok .
Step 3
Hit ok and the pattern fill is tilted to your desired angel. Easy right?
Got a Question you need answer to? Submit it and i will try to answer it as soon as i can!
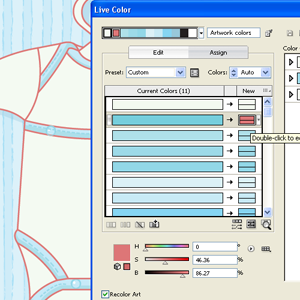
This illustrator technique is pretty useful sometimes , when you are done with a particular artwork and would like to work on something else using the same color scheme as well.Or sometimes the artwork has mesh tool and using mesh you have come up with new colors which are not part of your actual swatch. You can easily extract colors from the artwork either by using this tip that i shared a while ago OR by using this one click method!
Here i have created a Japanese dol and i used mesh tool for coloring her. As you can see , my swatch panel just has basic colors with which i started .
Click on the small arrow next to swatches panel and browse to Add used color , no fancy wordings either just straight to the point!. See below?
And there ! you have it , full swatches panel of all the colors used! Neat isnt it? 🙂
I hope this Tip will be useful for someone out there , i have few more with which i will be returning later. thanks for looking !
Tutorial Level :- advanced illustrator tutorials
Techniques Used :- Live paint & Knife tool
Reference illustration :- Ella At Peace
STEP 1
Create and decide the Artwork you want to work on
Since my aim here is just to share with you the process of coloring i will not be going much further in the details of drawing process but i will just elaborate my drawing a bit. I start by creating a sketch , then keeping it in front of me as a reference i turn to Flash . And start working with basic shapes circles and lines , here is a past tutorial on aivault which will show you how. After i am done i export the lines as illustrator 8 document . After opening it up in illustrator i have a clean crisp line which is exactly what i want. This little girl is part of a digital stamps series that i am creating for Aifactory Crafters community , her name is Ella and she is sitting in a yoga pose here 🙂 .
STEP 2
Choose Color Pallette
After I am done with the drawing I turn to color palette and decide on colors with a set of squares filled up with color tones for reference .
It is a good idea to convert your choice of colors into swatches if you are going to proceed with coloring using live paint.
In order to shift colors to swatches palette select a color and then from the tool bar drag and drop it into the swatches panel.
STEP 3
Coloring using palette
Once you have your color palette ready select your drawing which needs to be colored . you can easily navigate to next color by moving next arrow buttons on your keyboard. Select the color and then the paint bucket and start filling in the colors.
Keep on coloring selecting colors and filling spaces up, what fun!
After you are done filling in the basic flat fills you will now see a bounding box something similar to the one below . The whole drawing is at the moment one object , click on expand button you see on the top bar.
Right click and ungroup , this will break every section apart.
STEP 4
Shading
I love using mesh tool in my coloring it is a very handy and useful little shading tool , select a section and after selecting the mesh tool and your desired color click anywhere on the flat shaped area.
Continue with the shading wherever you require , more fun!!
Now i will be using another useful technique to give form to the body of the girl . I chose to start with the face click on the shape area and create and reserve a copy of it.
For her blushing cheeks create a circle with the same fill color as her face color . Select pink color and with mesh tool click anywhere in the middle of this circle.
Make a copy of it and place on both cheeks. simple hun?!
Now with the reserved face shape copy , using the knife tool cut out across the face somewhat like below
Discard the middle section and bring the cutout shape over Ella’s face. Give it a slightly darker tone .
you can further adjust it by reducing the transparency level as well.
Now for the shape and form of the body i will repeat the same step
Another way is just to choose the section , thanks to paint bucket and expand , we can easily select each section and slice it where it is and shade it.
I placed a green circle behind Ella and clicked in the middle while picking up a lighter tone . Below you will see i played with it a bit further and drew a flower on her shirt and clicked a few more times with mesh tool using another tone for hair. And i am done! Ella is all done , sweet and cute , i love her!
Ella is available for download through Aifactory store you can find her HERE
This detailed advanced illustrator tutorials how to create a diamond sparkling necklace metal tutorial will show you how i created the Diamond necklace available to download freely from Aivault through this post. The steps described here will take you through the process of drawing then coloring using very simple steps.
Star-off by creating a circle and we all know how to it by now 🙂
Next we will make use of the guides and star dividing the shape with equally sized straight lines and guide as a reference.
Step 2
USING GUIDES FOR DIVIDING THE SHAPE
Create a copy of one horizontal and one vertical line , select the rotate tool , while pressing alt create and rotate a copy of both lines as well as the guide lines.
Keeping the intersecting point of the guides and the lines as a reference align a square inside it , similar to the one seen below.
As shown below create a copy like we did with the lines and rotate it .
Now we need more guides placed , now i dont know any other way of creating the angled guides , i never really explored how to do it 🙂 , my process is to first unlock your diagonal and vertical guide select both using select tool , click on the intersecting point hold shift+alt and rotate the copy . Holding Shift will give you a snap to the middle point. hope it is clear below you can see the screen shot while i rotated the guides.
And here i have a copy done again you can do this by hitting CTRL+D which will repeat your last action.
With guides being our reference start drawing lines as shown below these are in pink color so you can see the progress
Step 3
ADDING DETAILS
Step 4
COLORING
Now turn off the guides once you are done. select the full divided / drawn circle with lines and square and using the Paint Bucket Tool fill it up with one color.
Ok you might say why not just fill the circle with foreground color change , the technique i used here is to break the full drawing up in sections and i prefer using live color option HOW? see below.
Here the full drawing is selected and then filled up with one single color . the bounding box you see below show that this is a live color object now .
Click on Expand which you will see on the top bar. This will break the full drawing into devided section making it easy for us to color each. Before doing that left click and ungroup.
Fill it up with gradience as show below
Create a star shape , i will not go into detail on how i did this one in short select the star shape tool with 6 points. create a copy place above and give a slightly tinted color.
Step 5
CREATING THE BACKGROUND
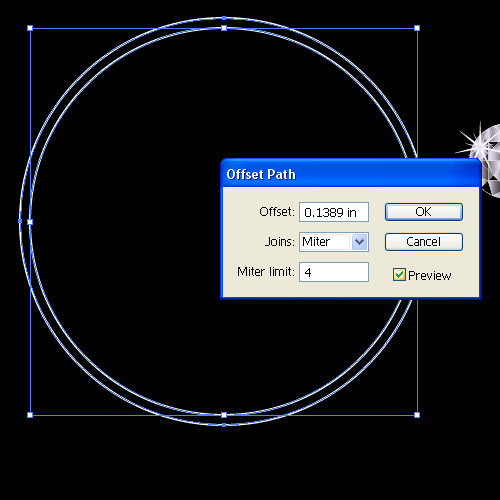
I created a black bounding box now and had sent it to back so i can better develop the final image. create a circle , and go to object>path offset path to create a bit smaller circle placed inside this one.
Using live Paint fill it up with gradient Create a copy and align in the middle
Group the diamond shape that we created above and start placing it inside the RING that we created.
Give a gradient to the rings as show below.
I created another ring silightly broader to place at the back of this whole drawing. ( create one , offset and use pathfinder to intersect You may want to learn the tools if you dont know then See the Guide here )
Again take a copy of this broader circle and place at the top , and draw an oval shape filled with same gradient.
Step 6
CREATING THE CHAIN
Start building the chain with the copy of the same thing
And Finally the whole thing is complete give a finishing touch by using copy of the SHINE we create using star shape and place it on top
FINAL PREVIEW
Create more copies and give a bit of transparencies.
[private]I’m Done! Share what you created if you create something using same technique! OR download the Vector File to explore my work place.[/private]
Writing enough Adobe illustrator tutorials Well not exactly 100 but enough to help someone adopt the same skill and enough illustration techniques is my target! 🙂
It has been 1 1/2 year since the launch of Aivault.com. During this time I wrote Adobe Illustrator tutorials ranging from basics to advance. Here is my compilation for easy bookmarking to these tutorials. If you are starting up with Adobe illustrator check out the Adobe Illustrator Tutorials in the basics and then move at your own pace to bit advanced one.
And if you are confused or stuck with a specific tool let me know I will be glad to write Adobe Illustrator Tutorials on request!
Affiliate Disclosure : This post contains affiliate links, However I only recommend products that I use and greatly recommend and are in my opinion are the best out there.
38 STEP BY STEP ADOBE ILLUSTRATOR TUTORIALS TO HELP YOU BECOME A VECTOR EXPERT
I have been using Adobe illustrator for the last 15 years. And I highly recommend that if you are serious about dipping your hands in Graphic Design as your career OR seeking to earn passive income doing graphic design services then you must get acquinted with Adobe illustrator.
Ok i love this illustrator technique : How to Coloring Artwork , this one saved me tons of time last night and i “had” to share it with you.
Ever had the need to create same illustration in multiple colors ? no need to recolor selecting each and every color here is a neat little shortcut in Adobe Illustrator to help you out. Here is my problem and solution walk through! (more…)
This tutorial will take you through basic shapes , using basic tools ie pathfinder , knife and eyedropper tools to create a cute duck character.
Following this tutorial you can draw a step by step illustrated vector tutorial file which will help you to actually look at how it is done! it is as simple as that! (more…)
How to Create a Cute Hippo Character in Vector .This tutorial will show you how to create cute Hippo Character using simple shapes and a really simple effective drawing technique . This technique has been adopted from recent addition to the store of Animal Head Graphic Set , latest addition to the store. Here is how it is done.
[private]This easy step by step tutorial contributed by Ryan of Vectips will show you how to create a a retro television icon just with some basic shapes and gradients. These technique are easily applicable to other icons, illustration, and logos!
This Tutorial covers the following basic techniques when using illustrator
Using Offset Path on an object
Learn to use Gradients to create surface texture and depth
")


 This tutorial was originally written for Premium members , and have stayed in the private collection for too long , it is time to get this story a little attention 🙂 so i am reposting this tutorial for regular readers. Hope you like it.
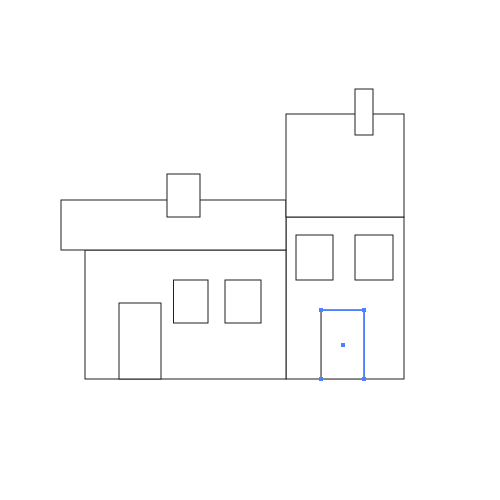


 [private]I’m Done! Share what you created if you create something using same technique! OR

 Ok i love this illustrator technique : How to Coloring Artwork , this one saved me tons of time last night and i “had” to share it with you.

